User Guide
This information is for an old version
This page contains information about Smart Shooter 3, which is an older version of the app. Smart Shooter 4 is now available to download and try!
Overview
Status Information
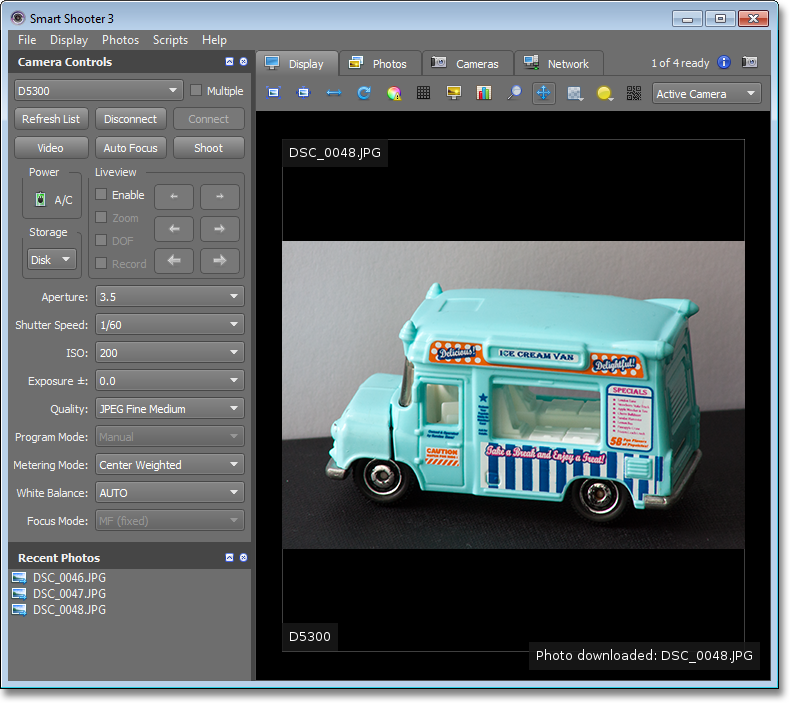
Information about the current status is shown in the bottom right of the display window, in the main Smart Shooter 3 window.
This will show information such as:
- When a new photo has been taken
- When a photo is being downloaded
- When a photo is being processed for display
- When it detects a new camera has been plugged in
- When a camera is connected or disconnected
- When an error occurs
For example in the screenshot below, the photo DSC_0048.JPG has just been downloaded and shown in the display.
Connecting to your Camera
When Smart Shooter 3 first starts, it will attempt to automatically detect if your camera is plugged in. Each camera it detects will be added to the drop down list, as shown in the screenshot below.
To connect simply click the Connect button.
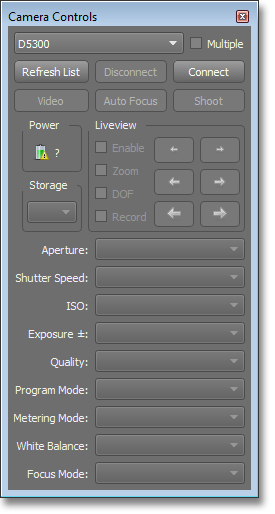
You can tell Smart Shooter 3 to detect cameras again by clicking the Refresh List button. You will need to do this if you plugged your camera in after Smart Shooter 3 had started.
Connecting to multiple cameras
When multiple cameras are plugged in, each one that Smart Shooter 3 detects will be added to the drop down list. For each one you want to use, select it in the list and then click the Connect button.
Taking a Photo
To take a photo simply click the Shoot button.
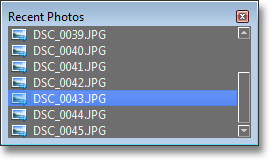
Once the photo has been taken, it will be added to the list in the Recent Photos window.
If the automatic download feature is enabled then Smart Shooter 3 will also download the photo to your computer. If the automatic view feature is enabled then Smart Shooter 3 will also show the photo in the display. Both of these features are enabled by default, and can be changed by clicking the check boxes in the Recent Photos window.
Tethered Shooting
Smart Shooter 3 can be used for tethered shooting, allowing you to use the camera manually.
Whenever you take a photo, Smart Shooter 3 will detect this and add the photo to the list in the Recent Photos window. It will also automatically download and view the image if those features are enabled.
Viewing a Photo
All photos that have been taken are added to the list in the Recent Photos window, as shown in the following screenshot.
To view one if these photos, double click the photo in list. If the automatic download and automatic view features are enabled, then the photo will be downloaded (if not already) and then shown in the display.
Zooming and Panning the Photo Display
The photo display can be moved and zoomed in and out using the mouse.
These controls can also be used when Live View is enabled.
Moving the display
To move the display, hold down the left mouse button and drag the mouse and any direction. This movement will move the display in that direction.
Zooming the display
To zoom the display, hold down the right mouse button and drag the mouse up and down. This up and down movement will zoom the display in and out. If your mouse has a mouse wheel, this can also be used to zoom in and out.
If your mouse does not have a right mouse buttom, you can instead hold down Shift on the keyboard whilst dragging the mouse with the left mouse button.
Moving the Live View Zoom region
If the Live View Zoom is enabled, the mouse also allows you to move the Liveview Zoom region. To do this, hold down the middle mouse button and drag the mouse in any direction. When you release the button, the Live View Zoom region will move to the closest possible position.
If your mouse does not have a middle mouse buttom, you can instead hold down Control on the keyboard whilst dragging the mouse with the left mouse button.
Changing Camera Settings
Camera settings can be changed using the Camera Controls window, as shown in the following screenshot.
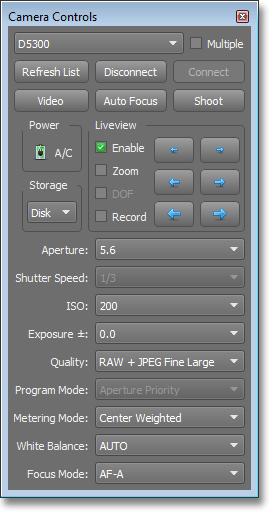
This provides drop down menus to change the following settings:
- Aperture
- Shutter Speed
- ISO
- Exposure Compensation
- Quality
- Program Mode
- Metering Mode
- White Balance
- Auto Focus Mode
To change a particular setting, click the drop down menu and select the value you want.
These values that are available are automatically detected from your camera. These values may change , for example if you alter the camera mode or change to a different lens.
If you are shooting manually with the camera tethered, you can change a setting on the camera and it Smart Shooter 3 will detect this and update the Camera Controls window to show the current value.
Keyboard Shortcuts
The following table shows the keyboard shortcuts you can use in Smart Shooter 3.
| Key | Description |
|---|---|
| T | Take a photo |
| Z | Take a photo on all connected cameras |
| F | Auto Focus |
| R | Run the currently loaded script |
| A | Select the aperture camera setting |
| S | Select the shutter speed camera setting |
| I | Select the ISO camera setting |
| E | Select the exposure compensation camera setting |
| Q | Select the photo quality camera setting |
| M | Select the metering mode camera setting |
| W | Select the white balance camera setting |
| Up arrow | Change the value of the currently selected camera setting |
| Down arrow | Change the value of the currently selected camera setting |
Using Live View
If your camera supports Live View, it can be enabled by clicking the Liveview check box in the Camera Controls window. You can continue take photos and change camera settings whilst Live View is enabled.
Live View camera focus
Whilst Live View is enabled, you can control the lens focus by clicking the focus buttons. There are three buttons to move the focus closer, and three buttons to move it farther away. Each button moves the focus by a different amount. The single '>' and '<' buttons move the focus by the smallest amount posible, where the '<<<' and '>>>' move the focus by the largest amount possible.
Live View Zoom
The Live View region can be magnified by clicking the Liveview Zoom check box. This switches the Live View output to a small region of the display which is displayed at a higher resolution. The Live View Zoom region can be moved using the mouse.
If you take a picture whilst the Live View Zoom is enabled, the camera will automatically disable the zoom option once the photo has been taken - this is an unavoidable limitation of Canon cameras.
Live View overlay display
The Live View display has an overlay mode, which allows you to change the transparency at which it is drawn in the display. The last viewed photo is always drawn behind the Live View image, so this allows you to adjust and compose your scene by comparing the Live View output to a photo.
To adjust the transparency, move the Liveview Overlay slider. This allows the transparency to be adjusting from between 0% to 100%.
If the Live View Zoom is enabled, the transparency does not affect the magnified Live View region, but it does affect the surrounding blank image.
Changing Options
The Smart Shooter 3 options allows you to change the following:
-
Photo Download Directory
This sets the directory on the PC where downloaded images are saved.
-
Photo Review Time
Whilst Live View is enabled, this affects how long a photo is shown for when a new photo is taken
To access the Options window, click File and then Options in the menu bar.
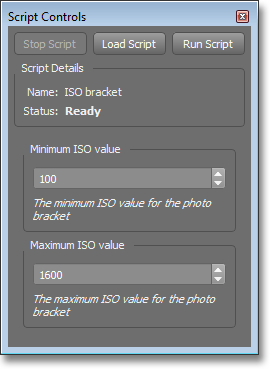
Running a Script
Running a script is done using the Script Controls window. If this window is not visible, click Display and then Script Controls in the menu bar.
Loading and Running
First to load a script, click the Open Script button. This brings up a file chooser window allowing you to specify the your script file. Once the script has been loaded, click the Run Script button to begin running the script.
Smart Shooter 3 will then carry out each command in the script file, until the end is reached.
Stopping a script
If you need to stop the script prematurely, click the Stop Script button.